Focus on Creativity, Not Clusters: DataStax Mission Control in Action!

Aaron PloetzDeveloper Relations

While many large enterprises have made use of managed databases, several still have significant workloads being served by self-managed solutions (both on-premises and in the cloud) like DataStax Enterprise (DSE) and Apache Cassandra®. Although a significant amount of those workloads will eventually be migrated to managed database services, there are reasons that many of them will stay in a self-managed paradigm.
To help those with large, self-managed Cassandra footprints, we introduced DataStax Mission Control in February. Combined with the cloud-native look and feel of DataStax Astra DB, Mission Control provides engineers with a powerful tool for managing their Cassandra clusters.
Here, we’ll take an in-depth look at Mission Control and discuss its architecture and setup options, and show it in action. Are you ready for Cassandra provisioning and advanced maintenance with the ease of Astra DB in your data center?
Introduction to Mission Control
Mission Control is an operations platform designed to help deploy and manage DevOps tasks on Cassandra and DSE clusters. It assists with deployments, upgrades, data operations, monitoring, and security. With Mission Control, you can manage all of your clusters and nodes, regardless of whether they’re racked in an on-premises data center or deployed in a private or public cloud.
Mission Control enables you to quickly and efficiently run operations on your Cassandra and DSE clusters. Many database and infrastructure-level tasks require intense time and focus to complete; Mission Control simplifies these to the push of a button:
-
Scheduling repairs
-
Taking backups
-
Handling the complete lifecycle of TLS certificates
We can also complete smaller tasks more efficiently with Mission Control. Have to restart a single node? You can do that in Mission Control with two clicks.
Want to run a rolling restart of all nodes in a cluster? Three clicks. The power to perform quick actions on a Cassandra or DSE cluster is literally at your fingertips.
For a short demonstration of Mission Control, have a look at Chris Bradford’s short video An introduction to DataStax Mission Control.
Not just another orchestration tool
Existing orchestration tools like Ansible, Chef, and Rundeck can certainly do a lot of the same things as Mission Control. However, the Cassandra-specific jobs or tasks for those tools would need to be built, and additional packages like Reaper (for repairs) and Medusa (for backups) would need to be bolted-on.
Mission Control comes with all of that out-of-the-box. All you need to do is add your clusters to a Mission Control project, and you’d have all of that functionality without writing any playbooks, Ruby, or Bash.
Requirements for installation
There are two main ways to install Mission Control:
-
On newly-provisioned instances (VMs, bare metals, cloud servers).
-
On an existing Kubernetes cluster.
Mission Control is designed to run on Kubernetes, and requires it to run. A Kubernetes runtime will be installed if the target infrastructure doesn’t already have one. Provisioning Mission Control on an existing Kubernetes cluster is also known as “Bring your own Kubernetes,” and it simplifies the installation process to a degree.
It is important to point out that Mission Control is a 100% Kubernetes-based solution. Mission Control runs on it, and all clusters that it manages need to run Kubernetes as well. And you know what?
That’s a good thing!
Large DSE or Cassandra footprints are so much easier to manage when they are run on Kubernetes. If you are self-managing Cassandra today in 2024 and you are not using Kubernetes, you should give it some serious consideration. It is time.
For detailed information, see the installation section of Mission Control’s documentation. You can also view and follow along with Alexander Dejanovski’s installation videos: Installing DataStax Mission Control on an existing Kubernetes Cluster and Installing DataStax Mission Control on new cloud instances.
Architecture
Similar to Kubernetes, Mission Control has both a control plane and multiple data planes (as shown in Figure 1). The control plane provides access to and enforces policies concerning the management and lifecycle of the database components. Similarly, the data planes have their own daemons or “kubelets” that execute actions on the data components.
Note: Mission Control requires Kubernetes both for itself and for future provisioning. It can either be installed on an existing Kubernetes cluster or installed with an embedded Kubernetes runtime.
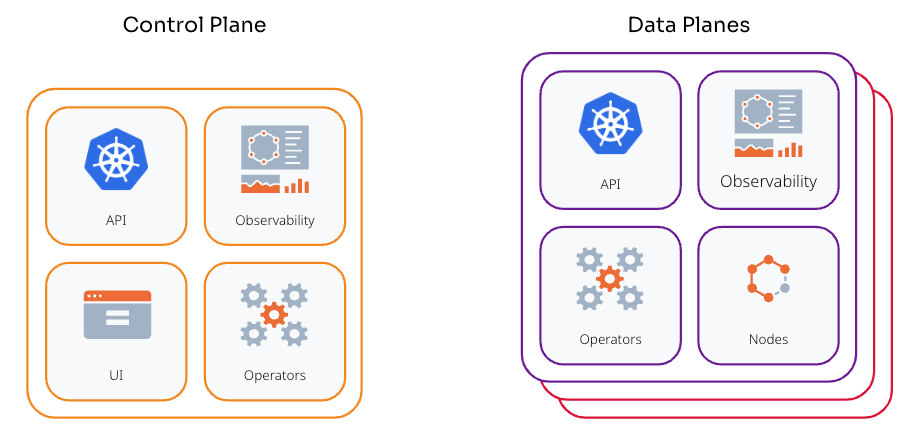
Figure 1 - A visual representation of Mission Control’s two main components: the control plane and the data planes.
When an operation is initiated (restarting a node, for example), a control plane operator contacts the specific data plane with the request. The data plane accepts the request and employs its own operator to act on the target node. Essentially, the control plane manages the state and decisions of the specific Mission Control instances, while the data planes execute the Mission Control workloads and manage their overall network communication.
Note: The control plane can act as a data plane, so it is not required for them to run on separate Kubernetes clusters.
The Mission Control user interface
Mission Control has a browser-based user interface (UI). It can be accessed on port 30880 from any of the Control Plane nodes. The URI for accessing the UI with a specific control plane node’s IP address should look similar to this:
Creating a cluster
Creating a new cluster with Mission Control can be easily done in the UI. First, you’ll create a project. A project is the top-level hierarchy for clusters managed inside of Mission Control. You can create a new project by clicking on the Project dropdown arrow (as shown in Figure 2) and selecting the “New Project” menu option. The only required parameter for a new project is the project name.
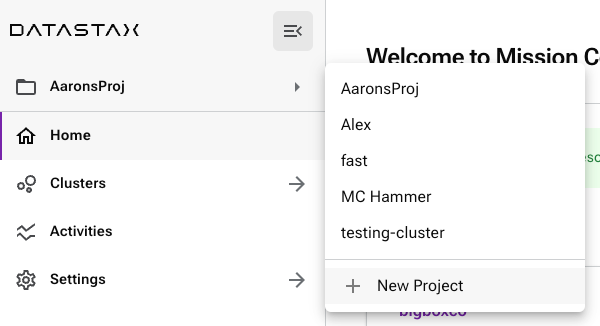
Figure 2—The project dashboard shows the Project dropdown menu expanded, with all available projects and an option for a “New Project.”
Once a project is created, a database cluster can be created inside of it. You’ll simply select your new project and click either the “Create Cluster” button (in upper right) or the “Create a Cluster” button (from the “Quick Access” section), as shown in Figure 4.
You can then enter details about your new cluster, including the name, product type, and version (Figure 3). You can also specify additional details about the cluster topology, including names for your data centers and racks, and even set specific cassandra.yaml or dse.yaml settings.
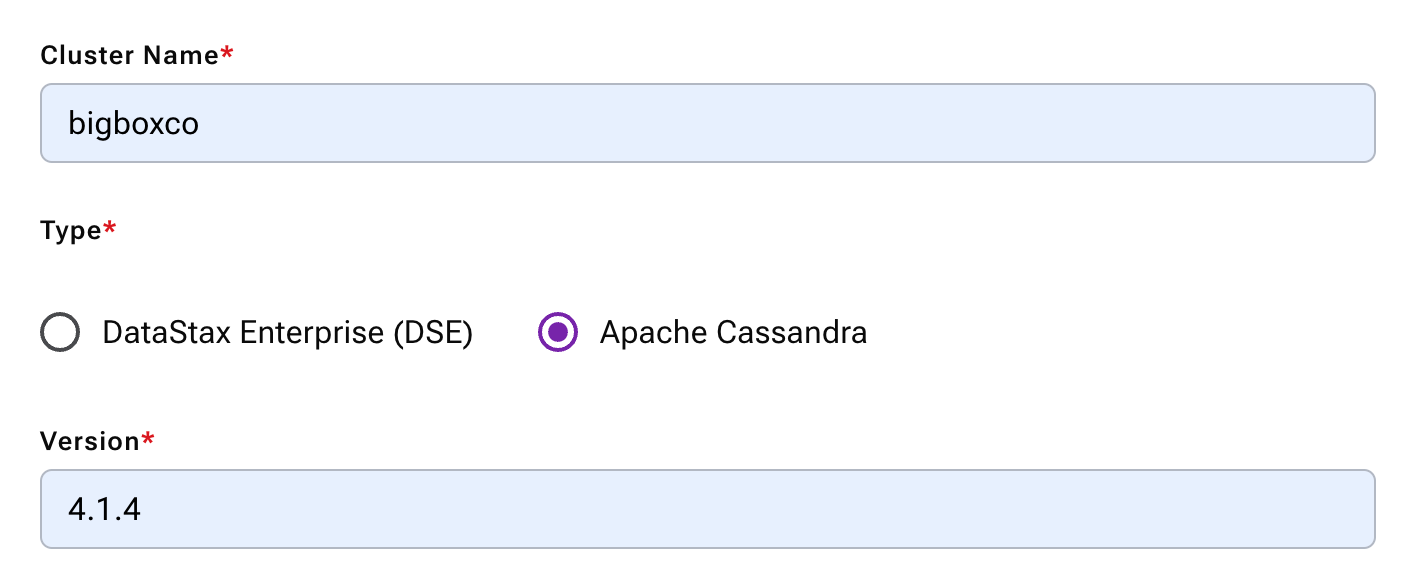
Figure 3 - The cluster creation inputs showing example details for a cluster named “bigboxco” to run on Cassandra 4.1.4.
This is also where you’ll be asked to specify the resources to be provisioned for each node, including RAM, disk space, and Java heap size. Your security preferences can also be indicated here, including a superuser password and whether or not you wish to use node-to-node encryption.
Note: Mission Control completely automates the lifecycle of TLS certificates used for node-to-node encryption, using the certificate authority specified at the time of the install.
After you finish entering your cluster and node details, the cluster will be created, and each node will come up one at a time. Once all of the nodes are “up,” your “clusters” section should look similar to what is shown below in Figure 4.
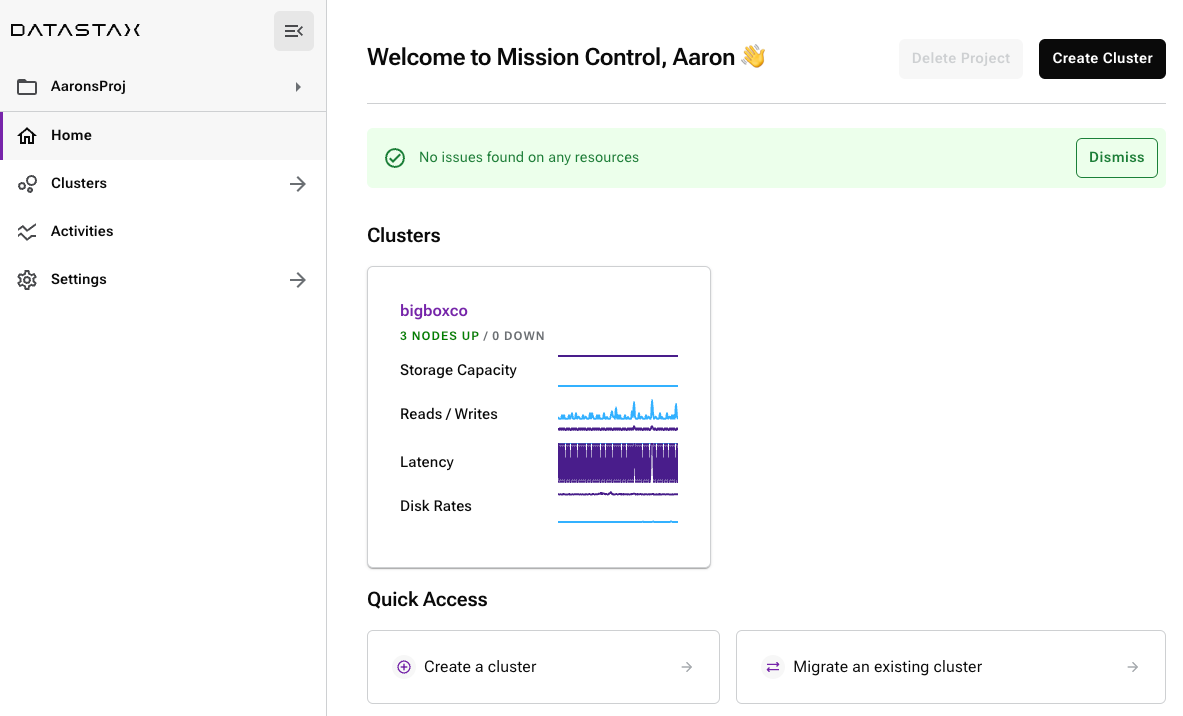
Figure 4 - The project dashboard showing a visualization of the current cluster footprint, along with buttons to create or migrate an existing cluster (into the project).
If you were to click into your cluster, you’d be presented with options for viewing performance metrics, and instructions on how to connect your applications to the cluster. You could also easily and quickly schedule tasks like backups and repairs or even perform operations on individual nodes.
So you’ve very quickly created a brand new, three-node Cassandra cluster with only a few clicks. The first node (8GB RAM) came up in about five minutes, and each node (after provisioning on our cloud provider) came up shortly thereafter. Add a few minutes to set the initial configuration options, and the entire operation only took about ten minutes. Normal Cassandra provisioning, even for small clusters, can sometimes take up to an hour.
While our attention in this section was focused on how much less time could be spent on cluster and node provisioning, that’s really just the tip of the iceberg. Clusters in Mission Control will require significantly less work to maintain over the years. When you think about the time that DevOps and DBRE folks could save and potentially spend on tasks that directly drive business value, the advantages and benefits of Mission Control become clear.
Want to see this in-action? Check out my short video Creating a cluster with DataStax Mission Control.
Why you need Mission Control
As a database professional, your time is invaluable. If you want to spend less time on the day-to-day operation of your clusters, and more time driving data storage innovation for your organization, then you need DataStax Mission Control. Even if the remaining database products in your enterprise still require another orchestration tool, Mission Control makes managing your Cassandra footprint so easy that switching will be worth it!
Mission Control is the next evolution in cluster management for Cassandra, DataStax Enterprise, and the new Hyper-Converged Data Platform (HCDP). It enables infrastructure engineers the ability to quickly and easily provision, upgrade, and maintain their organization’s complete Cassandra footprint.
In the next part of our series on Mission Control, we’ll dive into Day 2 operations and cover scaling up and down, scheduling repairs, backups, and more! Don’t miss it!
Be sure to check out the Mission Control landing page in our documentation and our Mission Control YouTube playlist for more information on how you can take your organization’s cluster management to the next level!
More Technology
View All


