One of the biggest challenges AI app developers face is ensuring the apps they build provide accurate answers. When the AI isn’t accurate, customers quickly lose trust in the app. As a developer, how can you be confident that your app will deliver accurate responses and create great experiences for your customers?
Getting applications to high accuracy requires trying many different techniques, tools, and parameters, and measuring each option to find the best results. For many developers this process can take days or weeks.
Here, we’ll show developers working with generative AI how to easily measure the accuracy of their AI apps, and rapidly test different approaches and techniques to get more accurate AI results.
Everything discussed in this post works with any AI use case, including agents and retrieval-augmented generation (RAG). We’ll use a standard RAG chatbot as a simple example, along with a standard benchmarking dataset to evaluate performance, and then make some quick improvements to our AI app to improve accuracy.
This process sets a basis for how to modify AI workflows and confirm that results are improving. After working through this tutorial, you’ll be ready to experiment with even more advanced techniques to improve accuracy, and be confident your AI is working better.
We’ll use the following components:
-
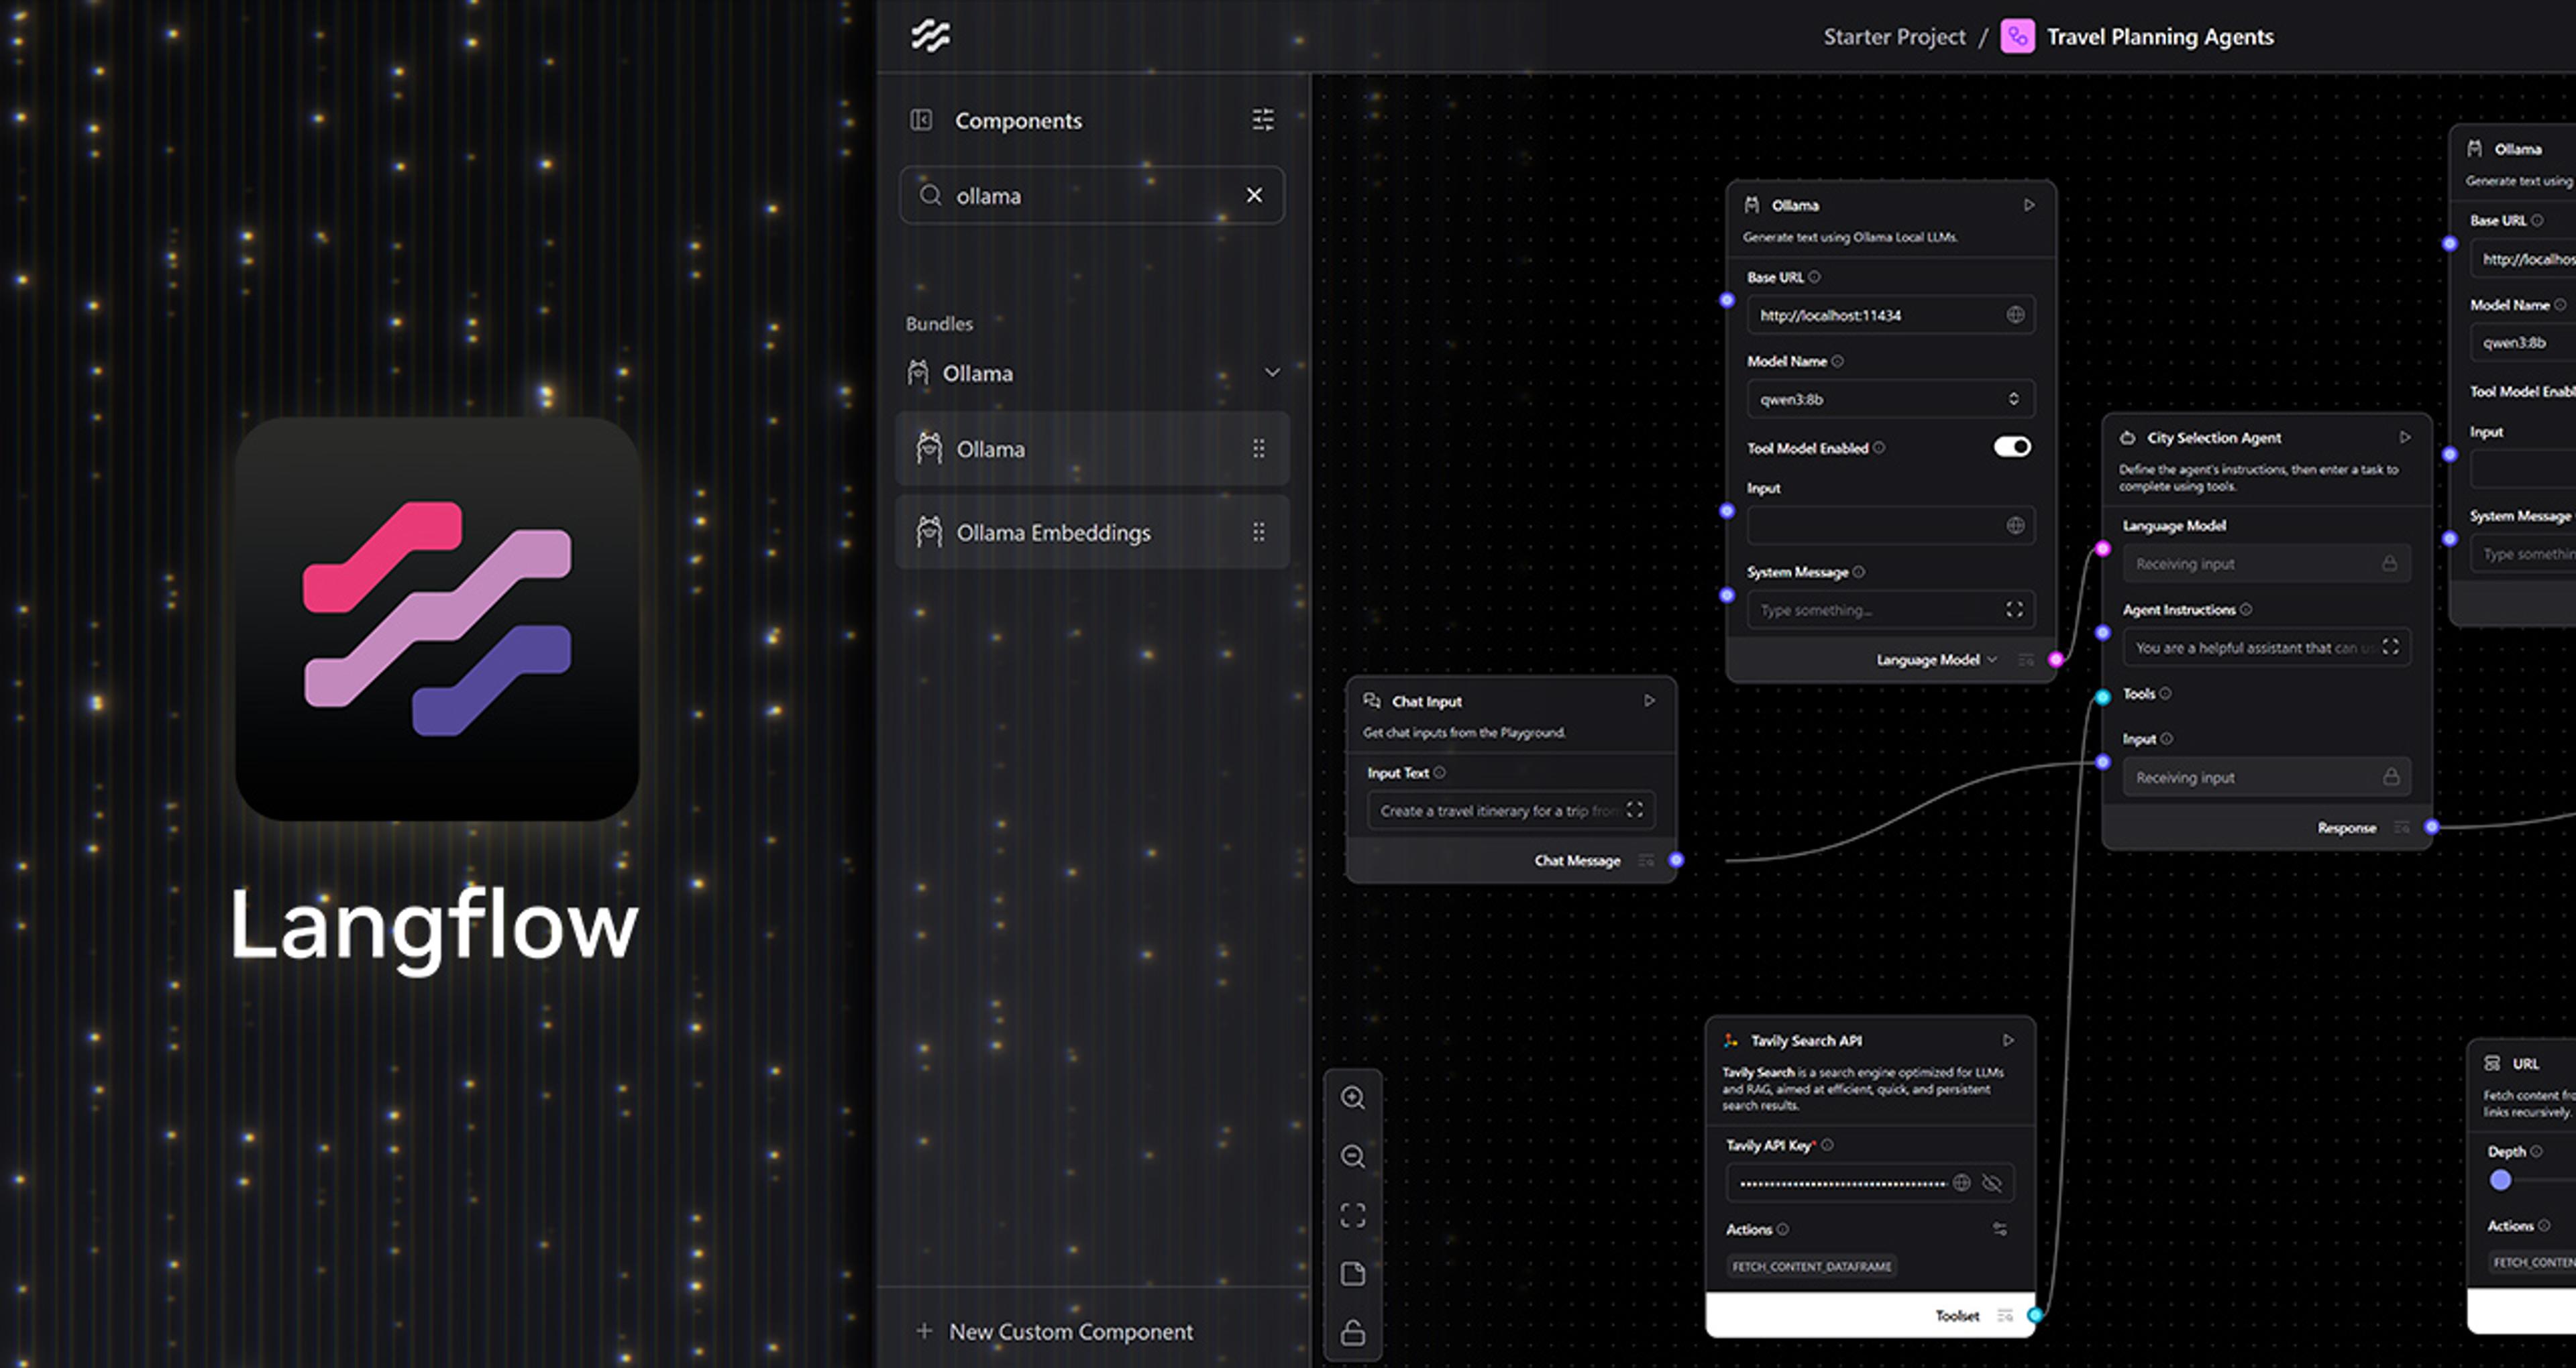
Langflow, an open source platform to rapidly build a RAG application
-
Astra DB, a vector-enabled NoSQL database
-
Experiment with NVIDIA NIM microservices, part of the NVIDIA AI Enterprise software platform
-
We’ll generate text using NVIDIA LLM NIM microservices
-
NeMo Retriever embedding model llama-3.2-nv-embedqa-1b-v2
-
NeMo Retriever reranking model nvidia/rerank-qa-mistral-4b to improve accuracy.
-
Python to develop the code
-
Arize Phoenix, an open source AI observability and evaluation tool
-
Stanford Question Answering Dataset (SQuAD) for measuring accuracy of the app
To configure a Python environment to work with all these services, you can follow the instructions in the links above, or run these commands locally on your computer:
pip install uv
uv venv
source .venv/bin/activate
uv pip install langflow pandas arize-phoenix -U
Creating a ground truth data set for evaluating RAG with SQuAD
What is a ground truth data set? It’s simply a set of inputs to a generative AI app with correct outputs. In the case of a chatbot, this will be a set of questions or queries and the correct answers that we can use to discern that our RAG process is working correctly.
SQuAD has built a large dataset of Wikipedia articles with multiple questions and answers per document. They have a small version of the dataset for developers that consists of 35 articles with about 6,000 questions and answers. We’ll use this smaller dataset here.
Full code for all steps is available here. The SQuAD dataset needs a little processing to get it ready to use; you can download a CSV file here that can be directly imported into a Pandas dataframe to get started with this exercise.
Let’s import that data set now and look at the first few examples of ground truth data.
import pandas as pd
df = pd.read_csv("qa_pairs.csv")
with pd.option_context('display.max_colwidth', None):
    display(df.head(3))
We should now see a few question and answer pairs:
| question | answer |
| Who increased British military resources in colonies? | William Pitt |
| What is the system by which prokaryotes retain phage gene fragments that they have previously come in contact with? | CRISPR |
| When was most of Sunnside developed? | 1950s through the 1970s |
Add the ground truth dataset to Arize Phoenix
Now that we have a ground truth dataset, let’s add it to Arize Phoenix. This requires a little code. First, make sure the Arize Phoenix app is running on your machine. You can do this in Python with the following code:
import phoenix as px
px.launch_app()
To confirm that Arize Phoenix launched properly, let’s open the UI. In a web browser, open a link to http://localhost:6006/. You should see the Arize Phoenix UI with a project called Default. If this didn’t work, take a look at the docs for Arize Phoenix on how to get started.
Once Arize Phoenix is running, take the SQuAD data set you made in the last section and add it to Arize Phoenix.
client = px.Client()
dataset = client.upload_dataset(
    dataframe=df,
    dataset_name="squad-dev-v2.0",
    input_keys=["question"],
    output_keys=["answer"],
)
After this runs successfully, you can now navigate to Datasets in the left navigation in the Arize Phoenix UI. You should now see a dataset called squad-dev-v2.0. Click into the dataset and verify that you can see the question and answer examples.
Now that you have a ground truth dataset, let’s build our simple RAG chatbot.
Create a data ingest flow in Langflow for the Wikipedia articles
For this section you’ll need to:
-
Download the 35 Wikipedia articles from SQuAD here
-
Sign up for a trial API key for NVIDIA AI Enterprise
-
Sign up for Astra DB (it’s free)
You can download the complete flow here and import it to Langflow.
In your Astra DB account, you’ll need to:
-
Create a database; let’s call it demo_db.
-
Create a collection; let’s call it squad.
-
Make sure vector enabled is turned on
-
For Embedding generation method, select Bring my own.
-
In the Dimensions field enter, 2048.
-
Click Create Collection.
-
On the Overview tab of your database in the Astra DB UI, you’ll see a button in the right column to Generate Token. Click this and save the token.
This will create a collection that you can use with the NVIDIA NeMo Retriever embedding NIM llama-3.2-nv-embedqa-1b-v2 to store vector data in Astra DB.
Now that your vector database is set up, let’s start Langflow. Head to a terminal window and run.
uv run langflow run
If you need help getting Langflow running, head over to the docs.
To create a new flow, click the + New Flow button and select Vector Store RAG from the Getting Started templates. You’ll see two flows loaded. On top is a chat flow and the bottom is a document processing flow.
Delete the top flow for now and just keep the document loading flow. To remove components from the flow, click on the component, click the triple dots in the upper right, then the Delete option in the menu.
Next, you’ll need to:
-
Delete the OpenAI Embeddings component by clicking the component, clicking the triple dots, and then clicking delete.
-
Now add the NVIDIA Embeddings component and connect it to the Embedding Model input on the Astra DB component.
-
On the model drop down, select nvidia/llama-3.2-nv-embedqa-1b-v2.
-
Add your NVIDIA API key.
-
Add your Astra Token to the Astra DB component
-
After adding the token, you can click the refresh button to the right of the Database field. This will repopulate the list and then you should see demo_db.
-
After selecting demo_db for the database, you may need to hit refresh next to the Collection field and the select squad.
-
Next you'll have to change the input component; follow the steps below.
Note that you can add tokens and keys directly to the component or you can create global variables to make it easier to reuse your keys.
Now change the file input to a text input. You can type “text” into the component search bar in the left navigation. You’ll notice that a text input outputs a “message” type with a blue dot and the “split text” component takes input of “data” and has a red dot. You’ll need to add a message to data component to convert the data.
Your flow should look like this:
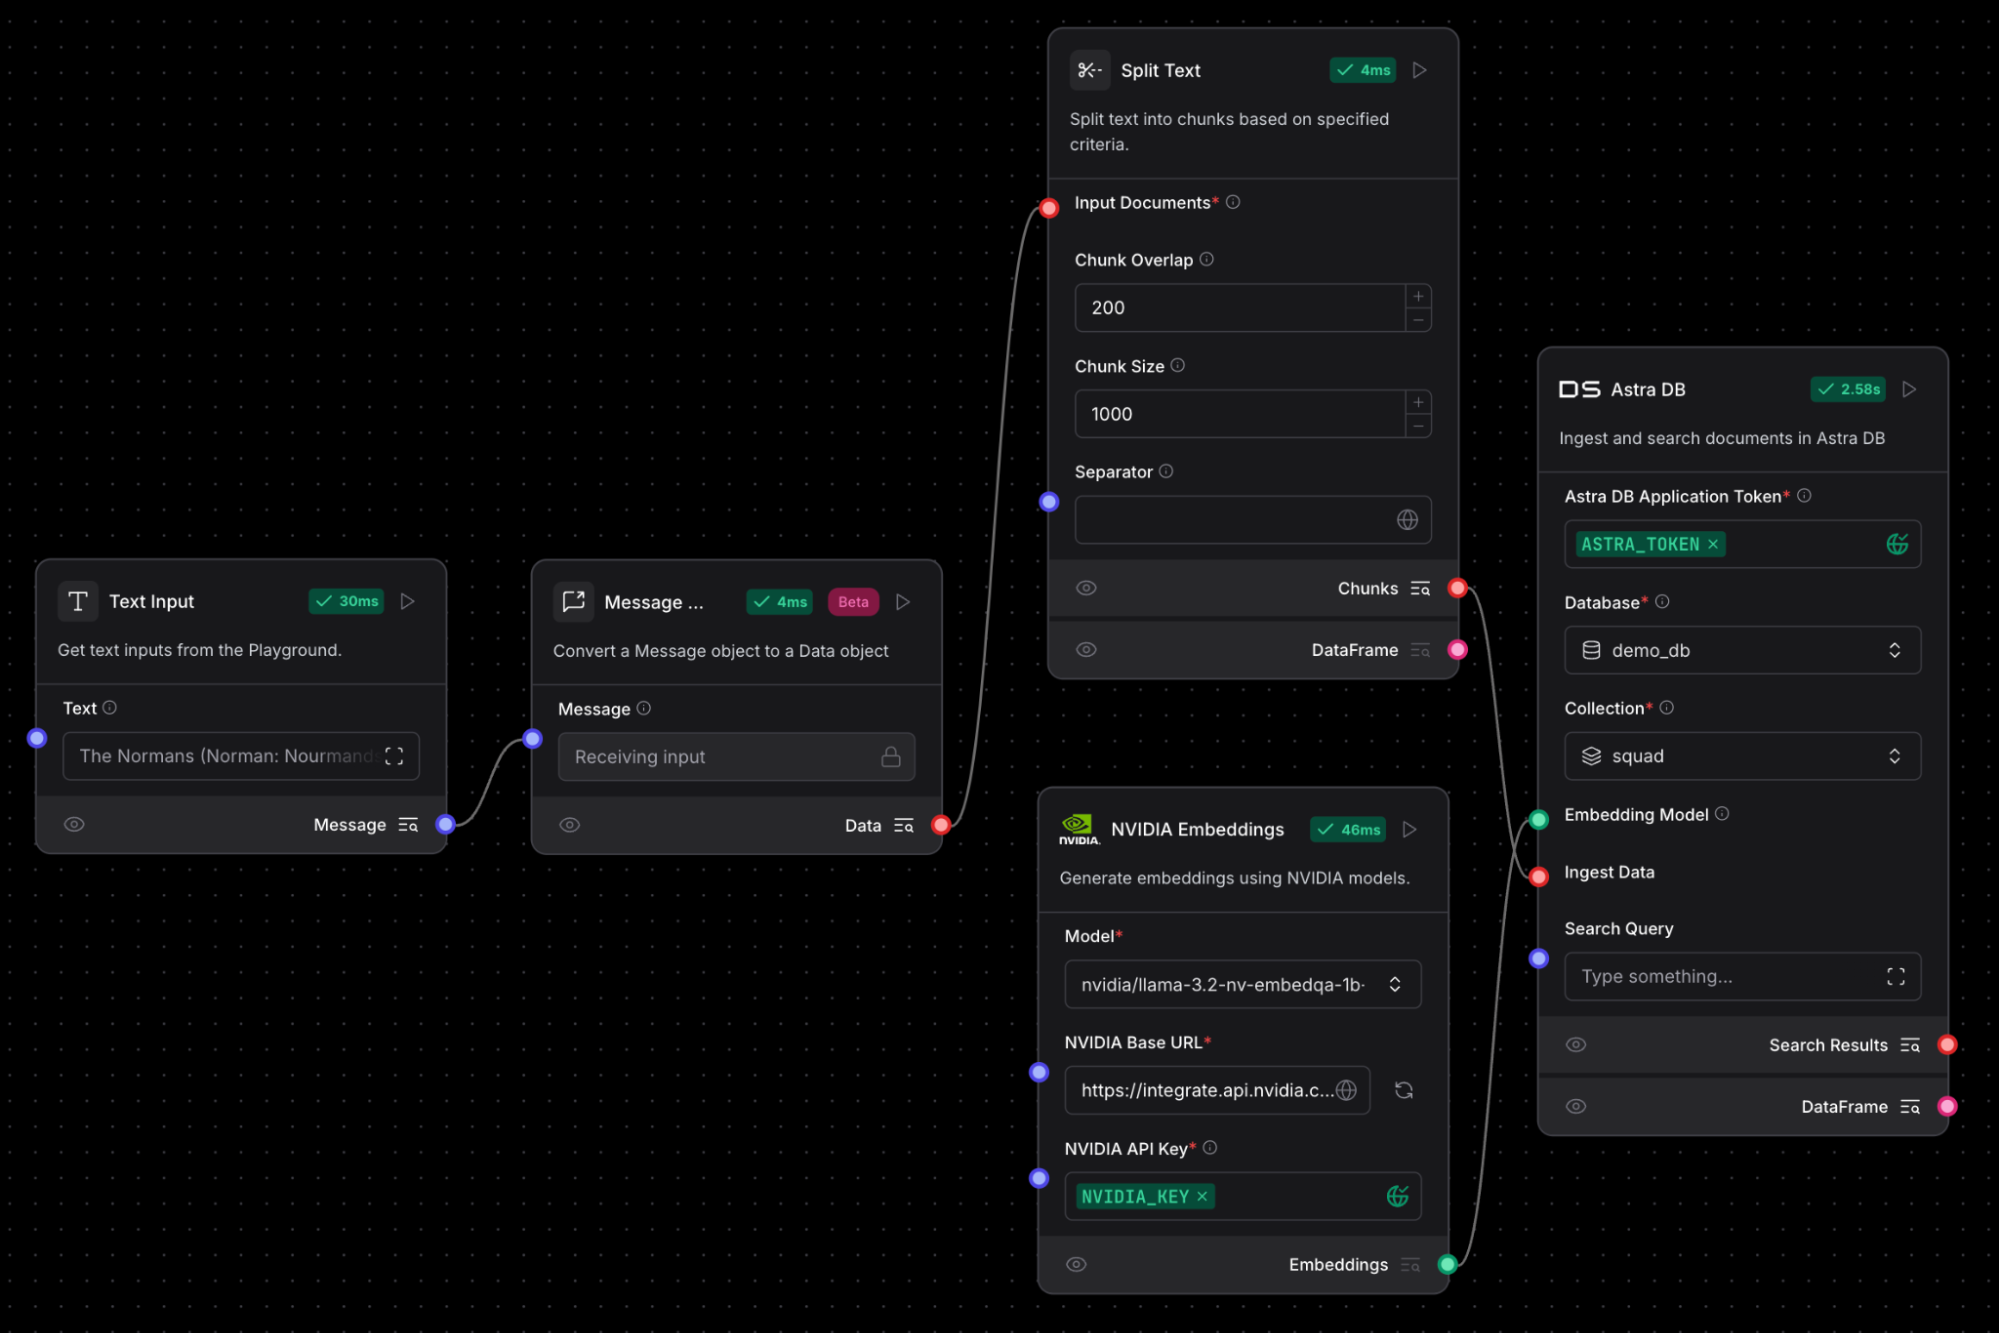 Flow to ingest Wikipedia articles with a text input, message to data, split text, NVIDIA NeMo Retriever NIM embedding component, and Astra DB vector store.
Now that you have a flow, use the Langflow API to run this flow for each of the 35 Wikipedia articles in the SQuAD developer dataset. You can download the already-clean file here.
This code will let you run flows in Langflow via Langflow’s REST API.
import requests

BASE_API_URL = "http://127.0.0.1:7860"

def run_flow(input: str, flow_id: str, input_type: str = "chat", tweaks: dict = None):
    api_url = f"{BASE_API_URL}/api/v1/run/{flow_id}"

    payload = {
        "input_value": input,
        "output_type": "chat",
        "input_type": input_type,
    }

    if tweaks:
        payload["tweaks"] = tweaks

    try:
        response = requests.post(api_url, json=payload, timeout=20)
        return response.json()
    except requests.exceptions.RequestException as e:
        print(e)
To find your flow_id, click the API button in the upper right of your flow in Langflow, then click to the Python API tab.
You can load your Wikipedia documents with the following code:
with open('squad_docs.json', 'r') as f:
    docs = json.load(f)

data_load_flow_id = YOUR_FLOW_UUID
for i, doc in enumerate(docs):
    run_flow(doc, data_load_flow_id, input_type="text")
    print(f"Completed processing doc {i}.")
Head back to the Astra UI and check your collection. You should now see several records with text from the Wikipedia articles in the Data Explorer tab. Now that you’ve loaded the data, you can build our chatbot.
Before you leave here, click the down arrow in the middle of the top of the screen in Langflow next to the flow name, Vector Store RAG. You’ll see an option to Edit Details. Click that button and give the flow a new name: Vector Store RAG - Ingest.
Design a basic chatbot in Langflow
Head back to the Langflow main menu by clicking the Langflow icon in the upper left, and then click the + New Flow button on the right. Select the Vector Store RAG template again.
You can download the complete flow here and import it to Langflow if you don’t want to follow the steps below.
This time we’ll modify the top flow, which is the chat workflow:
-
Delete the OpenAI Embeddings component
-
Replace it with the NVIDIA Embeddings component.
- Select nvidia/llama-3.2-nv-embedqa-1b-v2 for the Model.
- Add your NVIDIA API key.
-
Add your Astra token to the Astra DB component
- Select demo_db for the Database field
- Select squad for the Collection name
-
Remove the OpenAI component and replace it with the NVIDIA component from the Models section.
- Add your NVIDIA AI Enterprise API key to the NVIDIA component
- Select a model from the drop down, we recommend nvidia/llama-3.1-nemotron-70b-instruct
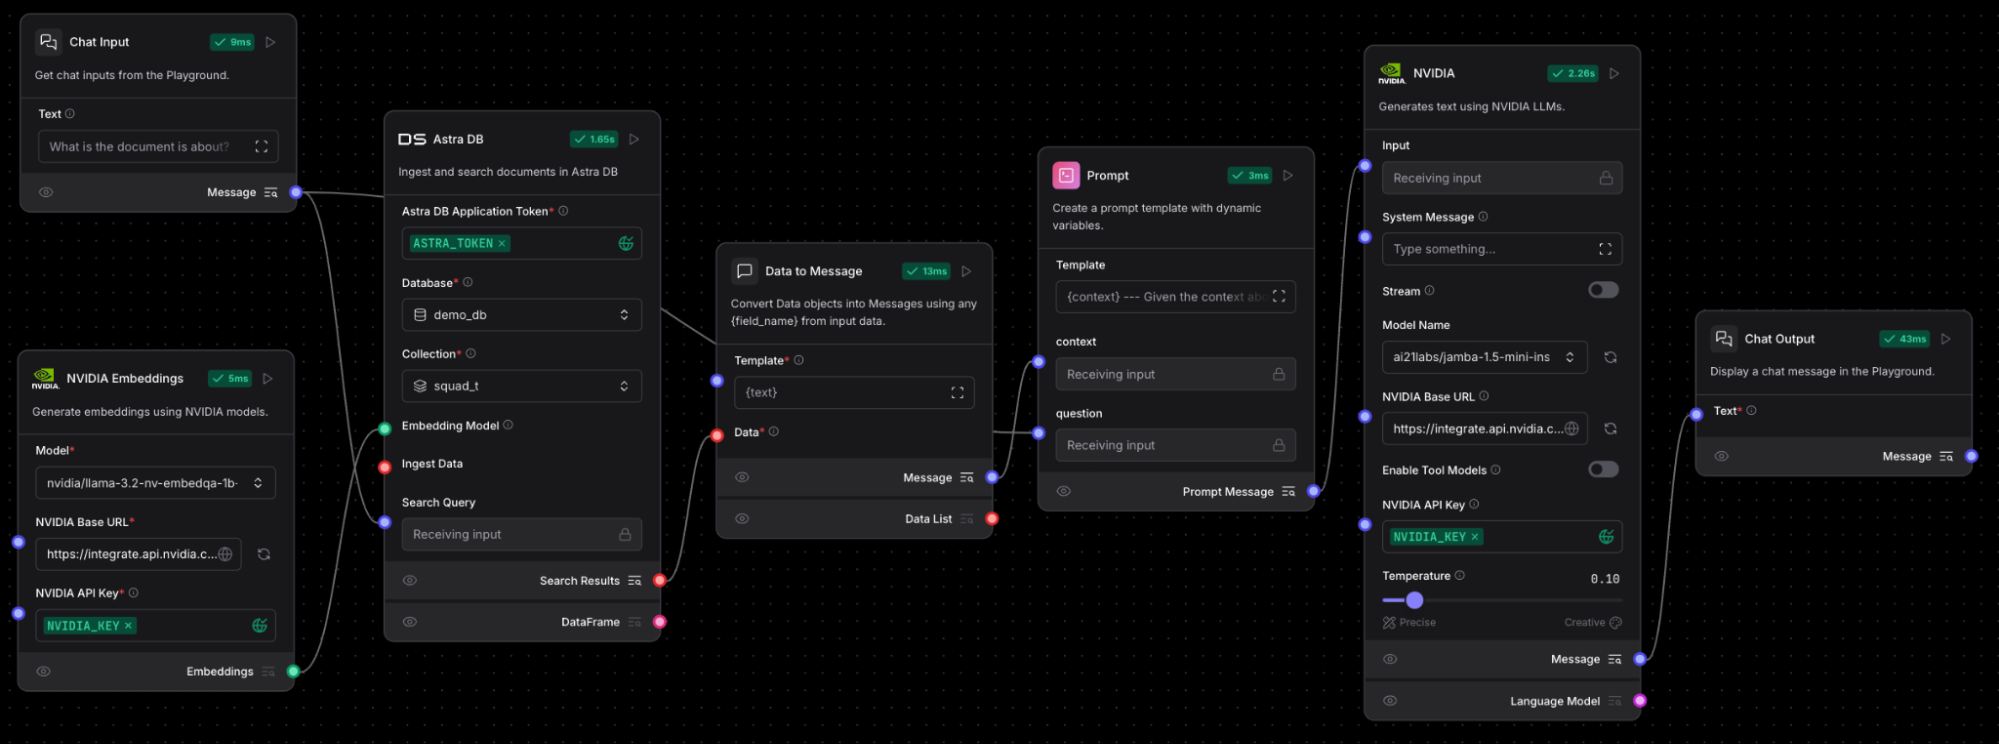 RAG chatflow with chat input, NVIDIA NeMo Retriever embedding, Astra DB vector store, parse data component, prompt, NVIDIA LLM NIM, and a chat output that generates text using NVIDIA NIM microservices.
Once all your keys are added, you should now be able to chat with the Wikipedia articles loaded in the last section.
Click the Playground button in the upper right and try asking the following question in the chat:
What is the highest peak in Victoria?
You should get back an answer that includes Mount Bogong. If you don’t, try adjusting the prompt in the Prompt component to change the behavior of the chatbot.
Connect Arize Phoenix to Langflow to measure accuracy
To measure the accuracy of our RAG chatbot, you’ll need to follow a few steps:
-
Get the flow ID of the chat to call Langflow
-
Define a task in Arize Phoenix to run the evaluation
-
Define an evaluator to measure the results
-
Run the experiment and log the results to Arize Phoenix
You can find the flow ID for the chat flow in the upper right corner of the Langflow UI. Click the API button and then switch to the Python API tab and copy out the flow ID.
To run the experiment, you need to define a task in Arize Phoenix. For this example, the task is simply to take a row of your dataset, submit the question to the flow in Langflow, and then return the result from Langflow.
CHAT_FLOW_ID = "YOUR_FLOW_ID"

def task(dataset_row) -> str:
    question = dataset_row["question"]
    response = run_flow(question, CHAT_FLOW_ID)
    text = response['outputs'][0]['outputs'][0]['results']['message']['text']
    return text
Now that you’ve defined a task, you’ll need to create an evaluator. Evaluators in Arize Phoenix are used to determine if the task was solved correctly or incorrectly.
There are many metrics you can use to measure a RAG chatbot. We’ll focus on Answer Correctness, which measures whether the response from the chatbot correctly answered the question. You will use the LLM as a judge method, where you have an LLM review the answer and determine if it is correct.
The Python code below will set up the LLM for judging.
Note that you should always use a different LLM as a judge from the LLM being used to produce the responses from the chatbot.
import openai
import os

with open("openai_key.json", "r") as file:
    keys = json.load(file)

openai_api_key = keys.get("openai_api_key")
openai.api_key = openai_api_key
os.environ["OPENAI_API_KEY"] = openai_api_key

judge_model = OpenAIModel(
    model="gpt-4o-mini",
    temperature=0.0,
)
Now that you have a judge, let’s create the evaluator.
from phoenix.evals import (
    QA_PROMPT_RAILS_MAP,
    QA_PROMPT_TEMPLATE,
    OpenAIModel,
    llm_classify,
)
from phoenix.experiments.evaluators import create_evaluator

@create_evaluator(name="Answer Correctness", kind="LLM")
def answer_correctness(input, output, expected) -> int:

    df_in = pd.DataFrame({
        "input": input["question"],
        "output": output,
        "reference": expected["answer"]
    }, index=[0])

    rails = list(QA_PROMPT_RAILS_MAP.values())

    eval_df = llm_classify(
        data=df_in,
        template=QA_PROMPT_TEMPLATE,
        model=judge_model,
        rails=rails,
        provide_explanation=True,
        run_sync=True,
    )

    label = eval_df["label"][0]
    explanation = eval_df["explanation"][0]
    score = 1 if label == "correct" else 0

    return score
There's a lot happening in the above code, so let's break it down a bit.
You're using an LLM to classify the answer as correct or incorrect. If you ask Python to print(QA_PROMPT_TEMPLATE) you’ll get a better sense of what is happening.
The prompt template looks like this:
You are given a question, an answer and reference text. You must determine whether the given answer correctly answers the question based on the reference text. Here is the data:
[BEGIN DATA]
************
[Question]: {input}
************
[Reference]: {reference}
************
[Answer]: {output}
[END DATA]
Your response must be a single word, either "correct" or "incorrect", and should not contain any text or characters aside from that word.
"correct" means that the question is correctly and fully answered by the answer.
"incorrect" means that the question is not correctly or only partially answered by the answer.
The code above simply fills in the variables in the template, and then runs the LLM query. You then convert correct to a score of 1 and incorrect as well as generate an explanation for why the LLM decided correct or incorrect.
The scores are then logged to Arize Phoenix and you can see the average of your accuracy score across the dataset.
To find the results, either click the link in the output of the Python code, or navigate to Datasets in the left navigation, then click the Dataset name squad-dev-v2.0 and you’ll see a list of experiment scores. Click into an experiment to see the exact results.
You should see:
-
Input - the question
-
Reference output - the correct answer from the SQuAD dataset
-
Experiment Name - This will have both the output from the RAG chatbot as well as the Answer Correctness score
Congratulations! You have now successfully run an experiment based on a flow in Langflow and logged the results to Arize Phoenix. For more details on running experiments, consult the Arize Phoenix documentation.
Let’s add a reranking model and see how it changes the accuracy of our RAG chatbot
Why add a reranking model to your RAG chatbot? Reranking models provide better matching results to the query than results purely from vector search. This blog post shows the benefits of adding a reranking model to your AI app.
NVIDIA AI Enterprise offers several reranking models that can be used to improve accuracy of results in a RAG use case. Let’s add a reranking model now and see how it affects our accuracy. You’ll need a NVIDIA AI Enterprise API Key.
Then you’ll add the NVIDIA NeMo Retriever reranking microservice component in Langflow in between your vector search with Astra DB and the prompt. For the model, select nvidia/rerank-qa-mistral-4b. You’ll need to connect the chat input to the Rerank component as well. Also note that a Data to Message component is needed to convert the rerank output to the input type of the Prompt component.
That’s all it takes to add a NVIDIA NeMo Retriever reranking NIM microservice.
Make sure you click on the Astra DB component, click Controls, find Number of Search Results, and increase this to a larger number, such as 25 or more to get better results. Experiment with different values for this number.
Your changed flow should now look like this:
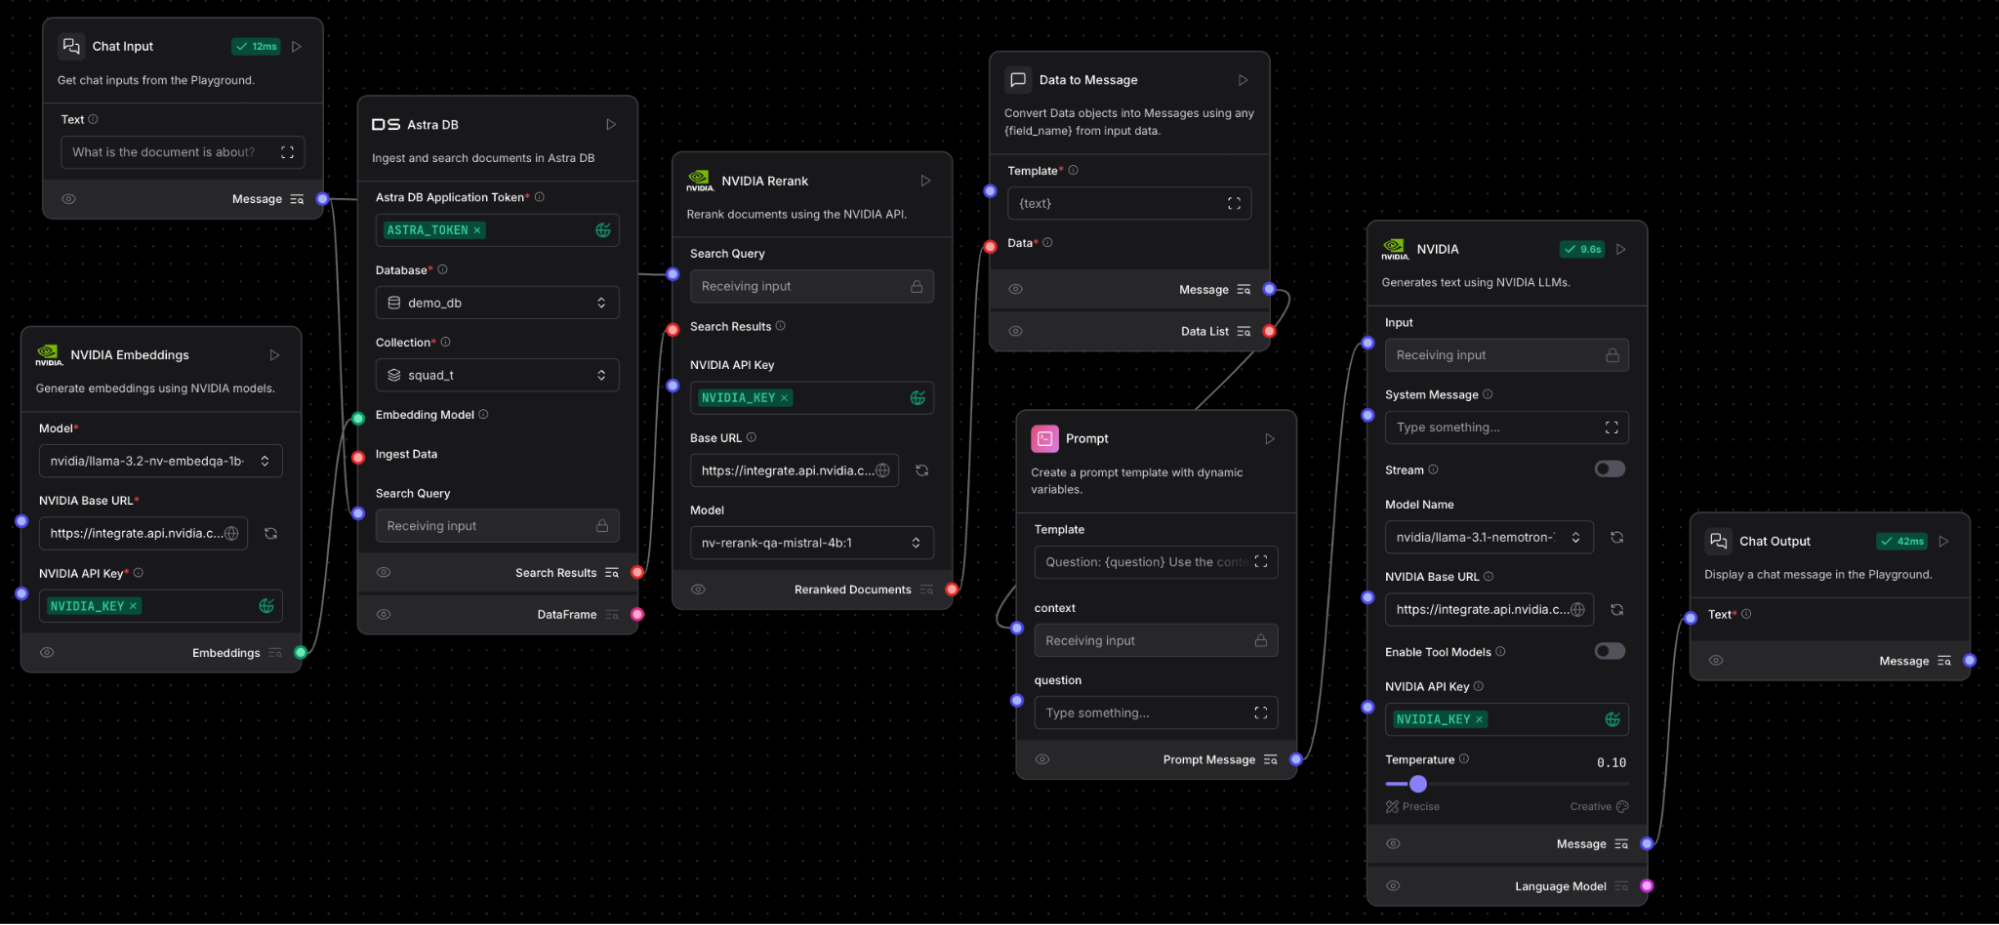 NVIDIA NeMo Retriever reranking NIM added after Astra DB vector search. A data-to-message component is needed to convert the rerank output to an input the Prompt component can use. Note the reranking model also needs the chat input to be connected. The chat output generates text using NVIDIA LLM NIM microservices.
Now go back to your Arize Phoenix code and run your experiment again. How did it change your results?
Conclusion
Building RAG and agentic apps with high accuracy is hard. Developers need to test many different AI design patterns and figure out which work best with their data and use case.
Langflow provides an open source platform to rapidly experiment with many different AI design patterns, integrate capabilities from NVIDIA, Arize Phoenix, and many other state-of-the-art tools for GenAI applications, such as Astra DB for vector search integrated with NVIDIA NeMo Retriever and NIM microservices.
Arize Phoenix provides an open source platform for evaluations, measurement, and observability, which enables devs to collect results and track over time how their changes are affecting accuracy of their apps.
We looked at how to connect multiple different NVIDIA AI Enterprise services with Langflow, including the NeMo Retriever embedding NIM through Astra DB, and NIM microservices for LLM and reranking. Through integrating with Arize Phoenix, developers can see how all these different tools and capabilities can be measured and drive up accuracy in AI apps.